The month of March and beginning of April were used to do the principal animation, including coloring and lip-sync. I also sent it out to Sam Zettell, who did the sound design. I then exported from flash into Adobe After Effects and converted to movie files, which I imported into Final Cut and combined with the sound. I created a title theme in Garage Band using the public-domain song, "Cataract Rag," and used public-domain footage cut together into a title sequence. The final product is below.
http://www.vimeo.com/eliyudin/growlymacdougal
Wednesday, April 25, 2012
Eli Yudin - February Progress
February, for my IP, I spent my time working out a rough run-through of the animation using the recorded voices to get the timing down and something I could watch and revise. I've attached one of these short rough animations, which is visible over/behind the newer additions.
http://www.swfcabin.com/open/1335382482
http://www.swfcabin.com/open/1335382482
Eli Yudin - January Progress
My time in January for IP was spent recording the voices I would need for my animation. I used the V-Room in the Duderstadt center to record the voices. I did the voice of Nelson and the gruffer cop, MY friends from my improv group, Aaron, Joey, and Matt did the Mayor, the Cop & Gary Schmeinfeld, and the Worker, respectively. The voice of Growly was done by Ricarlo Flanagan, a local comedian. It took a while to work it out around everyone's schedules. Here's a link to an unedited session with Ricarlo.
http://soundcloud.com/eyud29/growly-vocals2
http://soundcloud.com/eyud29/growly-vocals2
Saturday, April 21, 2012
Progress April 9th - 15th
I continued to spend a lot of time working with Tom Bray and Jeff Alder. I had to drive out to Belleville Michigan to pick up some par 36 lights. They were extremely expensive to rent but luckily Jeff had some colored gels I could use.
I also had to go through 30 minutes of footage that the girl had captured from the colored water and oil experimentaion. Then I had to re-learn final cut pro to edit the footage and create a loop so the same footage would replay itself on the projector. Once I had the footage looped, I then spent time with Tom figuring out how to put the footage onto the projector, which projector to use, and how to mount it to the ceiling. Mark Neilson and Tom Bray together helped me attach the projector to the ceiling of my installation space so it could be projected onto my pyramid inflatable. I wanted this footage to be projected onto the pyramid shape in particular because the dream was that the pyramid shaped sleeping bags were floating in a shallow pool of water. The projected images are intended to represent the reflection of water onto the sleeping bags.
It was difficult to figure out where each inflatable would go and if that would work well for the lighting. We had to figure out a way the space could work where other lights would be shown on the different inflatables but still not effect how much you could see of the projection. If the projection was too close to the other lights and inflatables, the viewers wouldnt be able to see the projection as well as if it was in a completely dark space.
Other minor details I had to figure out was how to hang the one Colorado inspired inflatable to the ceiling and have it be secure. I ended up using tape but conceiling it with a strip of the blue nylon rip stop so it still looked finished. I also used metal wire to attach the fan to the beam. Complications started when the motor of the fan blew in the ceiling and I had to sator wires together to and attach two motors to the fan. Luckily I was able to get the fan to start working again otherwise I would have had to reconstruct the airway to the fan along with finding a new fan that would attach the beam by the ceiling. I also had to decide which gels would be good accent colors for each piece. For the entry, I painted a stand black so I could place my postcards and business cards there so people could take them.

Image 1: 3 tubes (that represent colored worms from my dreams) I inflated everything figure out how much space I had.
 Image 2: This was after the par 36 lights I had rented were in installed. The installation was very stark without the colored lights and the projector.

Image 3: Screen shot of the colored water and oil footage I edited and placed in the projector to be projected onto the pyramid.
 Image 4: Pyramid Shape after the projector was installed and working.
 Image 5: Hanging inflatable after the colored gels were chosen and attached to the lights. There were three lights placed onto this inflatable. The three gel colors were orange, blue, and pink which helped bring out the imagery I had painted on using textile paints. Behind this inflatable is a door. The door bothered me a lot because it was so out of place. Once the colored gels were in place, the shadow of the inflatable created a really neat pattern on the wall behind it and camouflaged the door.
 Image 6: Originally I was planning on having white lights on the tubes but I tested out some colored gels and decided I liked the color on the tubes better. Plus the colored gels on the tubes helped darken the room so you could see the imagery from the projector on the pyramid better as well.
Logged Hours:
-Monday: 8:30am-12:30pm and 3:30pm-7:30pm (8 hours)- securing fans to inflatables, speaking with lighting company and visiting the hardware store
-Tuesday: 8:30am-5:00pm (9 hours) Meet with Tom Bray to edit projector footage, attach projector to the ceiling, drive to Belleville to pick up lights, work with Mark Neilson to sort out other installation issues
-Wednesday: 2pm -9pm (7 hours) Meet with Jeff to figure out where each light should be placed, finish attaching all lights to the ceiling (luckily my Dad was there to help), and decide which colored gels to use.
-Thursday: 4pm-9pm (5 hours) Finish completing all details of the installation, then the motor in the ceiling fan broke, drove to several different stores to find new motor, finally met with Rodemer who was able to help me get two new transformers and sator wires together. Then I had to re-attach he inflatable to the ceiling and finally I was done!!!
Total Hours: 29 hours

Image 7: Opening night! Finally done! I also visited several of the off site galleries over the weekend. It was great to see everyone's work finally completed.
I also had to go through 30 minutes of footage that the girl had captured from the colored water and oil experimentaion. Then I had to re-learn final cut pro to edit the footage and create a loop so the same footage would replay itself on the projector. Once I had the footage looped, I then spent time with Tom figuring out how to put the footage onto the projector, which projector to use, and how to mount it to the ceiling. Mark Neilson and Tom Bray together helped me attach the projector to the ceiling of my installation space so it could be projected onto my pyramid inflatable. I wanted this footage to be projected onto the pyramid shape in particular because the dream was that the pyramid shaped sleeping bags were floating in a shallow pool of water. The projected images are intended to represent the reflection of water onto the sleeping bags.
It was difficult to figure out where each inflatable would go and if that would work well for the lighting. We had to figure out a way the space could work where other lights would be shown on the different inflatables but still not effect how much you could see of the projection. If the projection was too close to the other lights and inflatables, the viewers wouldnt be able to see the projection as well as if it was in a completely dark space.
Other minor details I had to figure out was how to hang the one Colorado inspired inflatable to the ceiling and have it be secure. I ended up using tape but conceiling it with a strip of the blue nylon rip stop so it still looked finished. I also used metal wire to attach the fan to the beam. Complications started when the motor of the fan blew in the ceiling and I had to sator wires together to and attach two motors to the fan. Luckily I was able to get the fan to start working again otherwise I would have had to reconstruct the airway to the fan along with finding a new fan that would attach the beam by the ceiling. I also had to decide which gels would be good accent colors for each piece. For the entry, I painted a stand black so I could place my postcards and business cards there so people could take them.
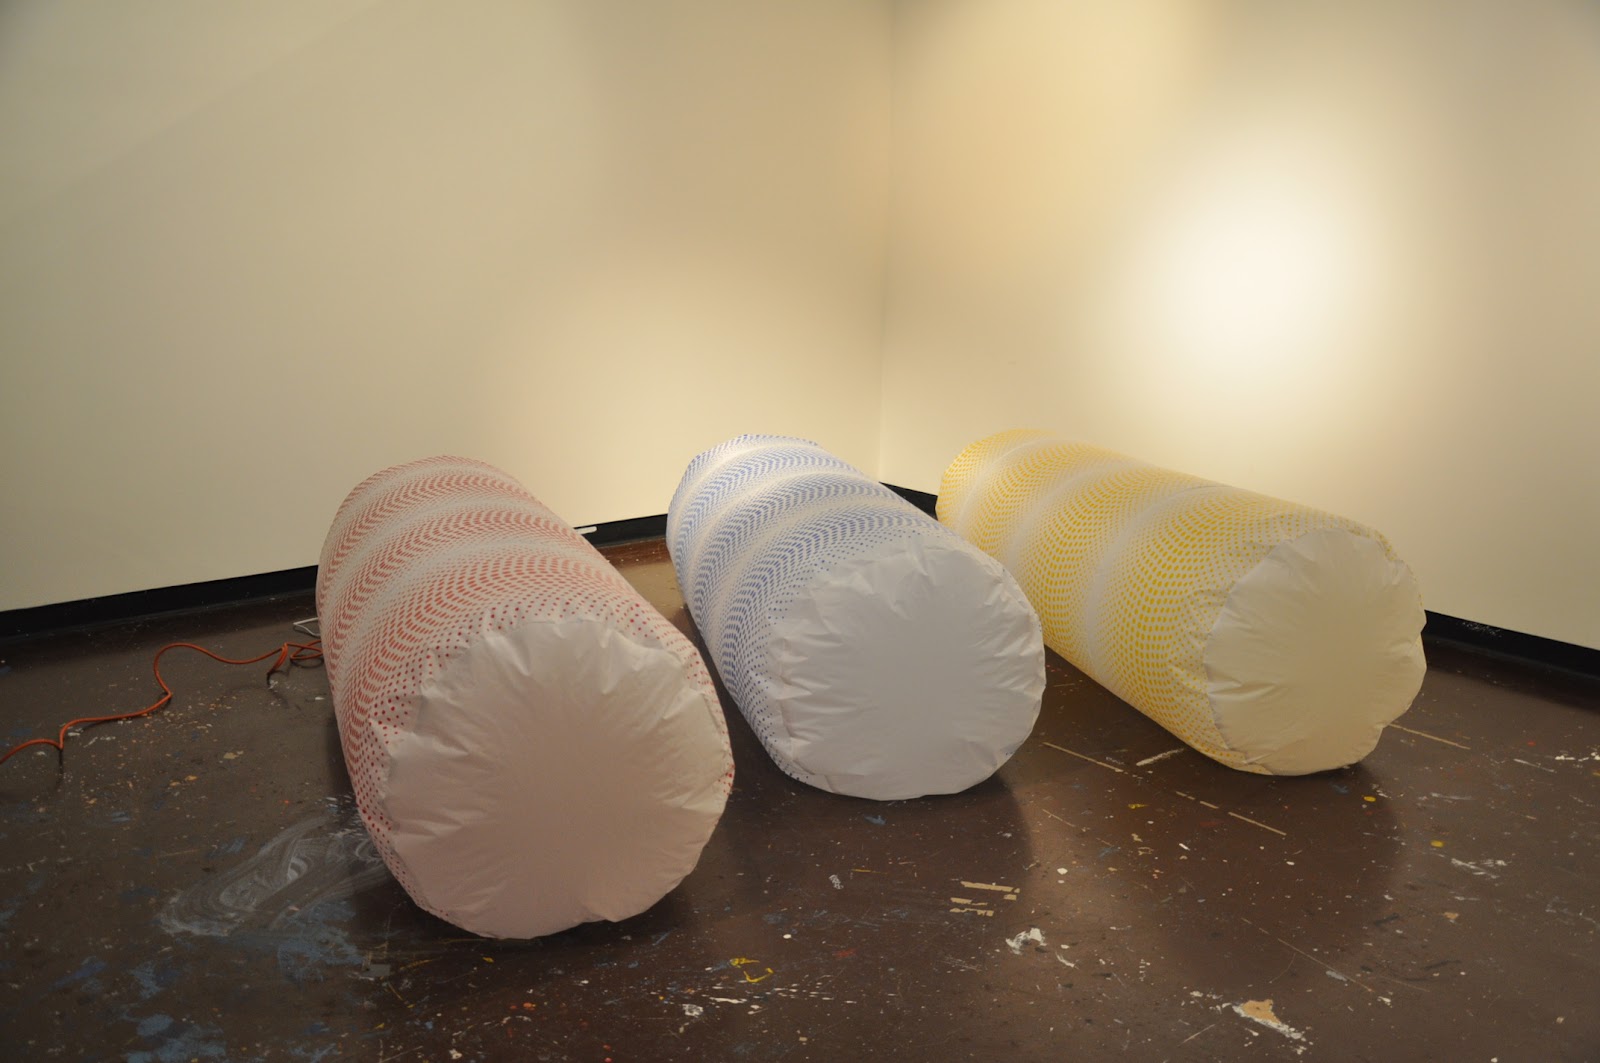
Image 1: 3 tubes (that represent colored worms from my dreams) I inflated everything figure out how much space I had.


Image 3: Screen shot of the colored water and oil footage I edited and placed in the projector to be projected onto the pyramid.


Logged Hours:
-Monday: 8:30am-12:30pm and 3:30pm-7:30pm (8 hours)- securing fans to inflatables, speaking with lighting company and visiting the hardware store
-Tuesday: 8:30am-5:00pm (9 hours) Meet with Tom Bray to edit projector footage, attach projector to the ceiling, drive to Belleville to pick up lights, work with Mark Neilson to sort out other installation issues
-Wednesday: 2pm -9pm (7 hours) Meet with Jeff to figure out where each light should be placed, finish attaching all lights to the ceiling (luckily my Dad was there to help), and decide which colored gels to use.
-Thursday: 4pm-9pm (5 hours) Finish completing all details of the installation, then the motor in the ceiling fan broke, drove to several different stores to find new motor, finally met with Rodemer who was able to help me get two new transformers and sator wires together. Then I had to re-attach he inflatable to the ceiling and finally I was done!!!
Total Hours: 29 hours

Image 7: Opening night! Finally done! I also visited several of the off site galleries over the weekend. It was great to see everyone's work finally completed.
Progress April 2nd - April 8th
I finally completed screen printing all of the tubes and then had to cut the end circles. I figured out the diameter and circumference of each circle but for whatever reason the circles I cut ended up being much larger than the actual tube shape. It ended up taking an entire day to figure out how to properly match of the circle shapes to the tubes.
 Image 1: I also had to find a way to secure the tubes to the back of the fans without using tape. I didnt want to use tape to attach the fan to the fabric because it looked incomplete and not thought out. In the end, I created a draw string for each tube that would be secured to the back of each fan.
 Image 2: MOCAD Joshua White Inspiration
To add to my installation, I continued to speak with Jeff Alder and Tom Bray about lighting and also getting a projector to project images onto the pyramid shape. As I explained in earlier blog posts, I got the idea of lighting from the Joshua White Light Show exhibit at the MOCAD. Joshua White was famous for his use of projecting bright swirls of color onto concert backdrops. He used several different colored lights as well. Through viewing this exhibit, I knew I wanted my installation to be dark and have lighting bring out certain colors in my pieces.
Jeff Alder and I spoke with several different lighting companies around the area to see where we could get the best deal on 6 par 36 lights. Jeff and I discussed how many lights she be on each inflatable and which inflatables we should use colored lights for. I was able to borrow colored gels from the Duderstadt center so I didnt have to pay for them. We also had to stay in contact with Mark Neilson and Peter to discuss what wattage we could use so we didnt blow a fuse in the gallery.

Image 3: Joshua Whites water and oil projections from the 70's (inspiration)
Tom Bray helped me with finding a projector that I could rent for 2 weeks along with some kind of footage I could use that was similar to the projections Joshua White used in his concerts. Joshua would put different colored water and oil onto a clear turntable that would be placed on a projector. As time was becoming an issue for me, I was afraid that I would have to create this footage myself. Luckily, Tom Bray knew a girl that had recently experimented with this Joshua White technique. She allowed me to use some of her footage and I was extremely grateful!
Logged Hours:
-Monday: 7pm-2am (7 hours)-screen printing tubes
-Tuesday: 2pm-5pm and 10pm-2am (7 hours)- screen printing tubes
-Wednesday: 5pm-2am (9 hours)- sewing inflatables
-Thursday: 10am-3:30pm (5.5 hours)-working on lighting and projector
-Friday: 1:30pm-10:30pm (9 hours)- sewing circles and trouble shooting size of circles and how to attach fans to inflatables securely
Total hours: 37.5 hours
Friday, April 20, 2012
Final Update: 3/18, 3/25, 4/1, 4/8, 4/15
3/18
The weekend before I was able to get in one more interview with John Johr in Chicago. Not only did I get John Johr that weeknd, but the night before him I got the interview with Marco Bailey recorded as well in Detroit. That entire week was spent up all nights editing the interview (creating a storyline from 30 minutes of footage down to 7 minutes, one of the most painful feats ever), gathering broll footage and images for it for two videos. The goal was to have both of them finished before the final in class critique.


3/25
I continued working on editing the videos, but also I wanted to get started on the site to house them. I made a very brief mock-up for the critique simply showing how the video would look on an expanded tab with large image background. I put my time into researching what jquery effects i could employ for my site.
4/1
Hardcore coding goin at work to make the background image stretch to window size, making sure all the navigation shows up on the image backgrounds, tabs expand to correct percentage size, content fades in and out on page load, music player getting towork, logo menu button to display menu on hover, and figuring how to do a horizontal div layout for the review section and jquery scrollbars.


4/8
Majority of the site structure had been completed, with navigation set, songs chosen and uploaded, background images put up, interviews as well. YOS video saw a lot of changes with shorter time, more pertinent information, and more resources added to it. In addition to re-editing,


4/15
Work was being done until the last minute on the piece for installation. For the actual gallery, I set up the monitor screen hooked up to laptop on a podium. In order to catch passerby's attention, I printed and placed some of my best photos from the project on the wall along with the title and logo of my website. I also experienced issues with the fact that I was supposed to originally was supposed to use a desktop computer however, they did not have a wireless card. Overall, I encountered few issues setting up. On the website, I added a song page and added new photos I had happened to take the night before by chance, fixed the music player that was having issues just in time for the gallery opening.

The weekend before I was able to get in one more interview with John Johr in Chicago. Not only did I get John Johr that weeknd, but the night before him I got the interview with Marco Bailey recorded as well in Detroit. That entire week was spent up all nights editing the interview (creating a storyline from 30 minutes of footage down to 7 minutes, one of the most painful feats ever), gathering broll footage and images for it for two videos. The goal was to have both of them finished before the final in class critique.
3/25
I continued working on editing the videos, but also I wanted to get started on the site to house them. I made a very brief mock-up for the critique simply showing how the video would look on an expanded tab with large image background. I put my time into researching what jquery effects i could employ for my site.
4/1
Hardcore coding goin at work to make the background image stretch to window size, making sure all the navigation shows up on the image backgrounds, tabs expand to correct percentage size, content fades in and out on page load, music player getting towork, logo menu button to display menu on hover, and figuring how to do a horizontal div layout for the review section and jquery scrollbars.


4/8
Majority of the site structure had been completed, with navigation set, songs chosen and uploaded, background images put up, interviews as well. YOS video saw a lot of changes with shorter time, more pertinent information, and more resources added to it. In addition to re-editing,


4/15
Work was being done until the last minute on the piece for installation. For the actual gallery, I set up the monitor screen hooked up to laptop on a podium. In order to catch passerby's attention, I printed and placed some of my best photos from the project on the wall along with the title and logo of my website. I also experienced issues with the fact that I was supposed to originally was supposed to use a desktop computer however, they did not have a wireless card. Overall, I encountered few issues setting up. On the website, I added a song page and added new photos I had happened to take the night before by chance, fixed the music player that was having issues just in time for the gallery opening.

Wednesday, April 18, 2012
Last 3 Weeks Post


So the last three weeks before the show was a lot of prep and set up, ie making the dinner, finalizing the table, oiling the wood, screwing all the bits together, sealing the hydrocal, laser cutting the boxes, designing and printing out the dinner cards...
And then of course installing into the gallery...
I didn't really leave the art school for more than 3 hours a day...
Images of final product above.
Subscribe to:
Posts (Atom)