Wednesday, February 29, 2012

Progress Feb 20-26

I've filmed the final section of the video for Concertina, here are some stills from the filming session:


I've started some abstractions for Walking on Eggshells as well, here are some stills from what I am working on. The technique is slow to produce but yielding nice results so far.


Hours
Monday 4
Wednesday 2
Friday 3
Saturday 3
Sunday 6

Friday, February 24, 2012

Progress update

Just realized that I forgot to post my progress for last week, got a bit caught up in filming I guess.
So, here it is.

I filmed on-site (the indoor and outdoor footage) for Concertina last weekend and will be filming the band in the studio this weekend.
Here are some stills from the Concertina filming.


Hours for this week
Monday- 2
Tuesday-3
Thursday-5
Friday-4
Saturday-5
Sunday-1

Tuesday, February 21, 2012

Elyse Shapiro Studio Progress Feb 13-19

Studio Progress Update for Week of February 13th to 19th

This week in the studio, I completed the imagery by getting the inner layer printed onto vellum. This was then placed beneath the polycarbonate, stencil, and a layer of mylar. The image below was placed onto a light box, but the construction of the lamp are still in the works. This is also the imagery that I used in the design of my postcard image. Following the completion of this image, I began to design imagery for my next lighting fixture. I decided the new imagery would be largely revolved around the idea of graffiti in Detroit because the reaction to these images was so strong in my most recent review. I spent the majority of the day wednesday in Detroit walking around the east side and taking pictures of graffiti on various buildings. Then, I compiled the most interesting and, in my opinion, stencil-worthy graffiti tags onto a an imaginary building in Detroit. I used images of various windows I also spotted on my visit to ensure they looked realistic and native to Detroit. After completing my design, I printed and assembled it together, and have began to cut that into black paper.


In-studio hours, week 7:

Monday- Apply stencil and vellum and photograph for postcard, work on bending metal in the cold metals studio (4 hours)

Tuesday- Brainstorm ideas for future imagery, prepare first stencil cut for review (4 hours)

Wednesday- Go to Detroit to photograph graffiti on the east side of the city (6 hours)

Thursday- Cut stencil in studio (9 hours)


Total: 23 hours

ProGRz

Here are 5 illustrations for the limerick series I am doing.
Monday-2
Tues-6
Thurs-8
Sat-4
Sun-5

Progress 2/20

This past week was mainly dedicated to getting all the individual squares sewn for the second quilt. It's been time consuming, since each square has 7 parts and I have to iron all the seams in between attaching each part. But they're just about done! I only have one more piece to attach to all of them, and after that I'm going to start assembling and sewing them into the quilt layout that I designed. I hope to have this top layer of the quilt finished for my critique on Thursday.


In addition to this, I also contacted Jim Cogswell, per Mariannetta's request. We are meeting this afternoon in my studio to discuss my current progress, and ways to resolve my first quilt.

Hours
Tuesday, 2:30 - 4:30 (2 hrs)
Wednesday 5 - 8 (3)
Thursday 10 - 1, 2:30 - 4:30 (5)
Friday 4 - 7 (3)
Sunday 4 - 6:30, 9:30 - 2 (7)

Total: 20 hrs


Progress 2/21/12

So here's the progress. No real big changes just progress. I've calculated materials for the most part and need to consider some ideas for displaying it but for now it's just working on my wallpaper blocks. Here is an image of the giant block being started.
Hours:
-7 carving
-4 mocking up wallpaper
-.5 critique
-3 miscellaneous planning

Monday, February 20, 2012

Update

This week I did a lot of sketching for my next zine on animal mating rituals, which I decided to split up between the common themes of sexual selection and competition, courtship, and the actual act. I also have been collecting for the show: I picked up a buffalo jaw bone and a bell jar. I also found my shells, coral and elephant bird eggshell fragments from Madagascar. I've got a shadow box and a wood suitcase box separated into small sections. I've also been asking around for bones and other items people would be willing to loan. I am going to look over break at property disposition and other like places for a 'cabinet'.


Hours: Tuesday 4hrs, Wednesday 2hrs, Friday 4hrs, Saturday 4hrs

Update

I was able to render out about half of my entire animation, and now I'm finishing them out with sound and effects.  Below are the current samples, I have about 6 more to put through AfterEffects, and I need to still animate about 10-12 scenes.

I'm getting a little worried as I'm behind on the animation/videos, and my backup plan of just having a solid animation without the text messaging interactivity is still in place.  I think I should be able to complete everything, but between the render garden acting up and various computer problems, we'll see how it goes.  Regardless, even if it's after IP, it will eventually be up in total form with the text messaging functionality in place.

A few things:

  • Sounds are 90% there, and some have been reused.  More to come, just needed some filler for now.
  • Camera hiccup in s8_demo
  • Text refresh problem in s3_demo.
  • These videos are examples of what you'll see, but there's only one loop at the end, as opposed to infinite before the user clicks "next page"
(Not to be a dick, I'll try and put these into one video for next blog post, sorry for the length)

2-19-12 Arambula Post

This week I began to wire the cage to the main frame. Also more was added to the bulbs and experimented with different writing on mercury bulbs, I have been in contact with the wax company hoping to order this coming week. outside ~16hrs

Feb 19th update-Teresa Dennis

Putting skeletons in my characters, working on importing into z-brush and learning z brush. Z Brush will assist me in the colors of the models. Can post a picture of them tomorrow.


Monday- 4 hours
Tuesday- 7 hours
Wednesday- 5 hours
Thursday- 6 hours
Saturday- 3 hours
Sunday- 4 Hours

Sunday, February 19, 2012

Progress

This blog post of for the past two weeks.

Image 1:
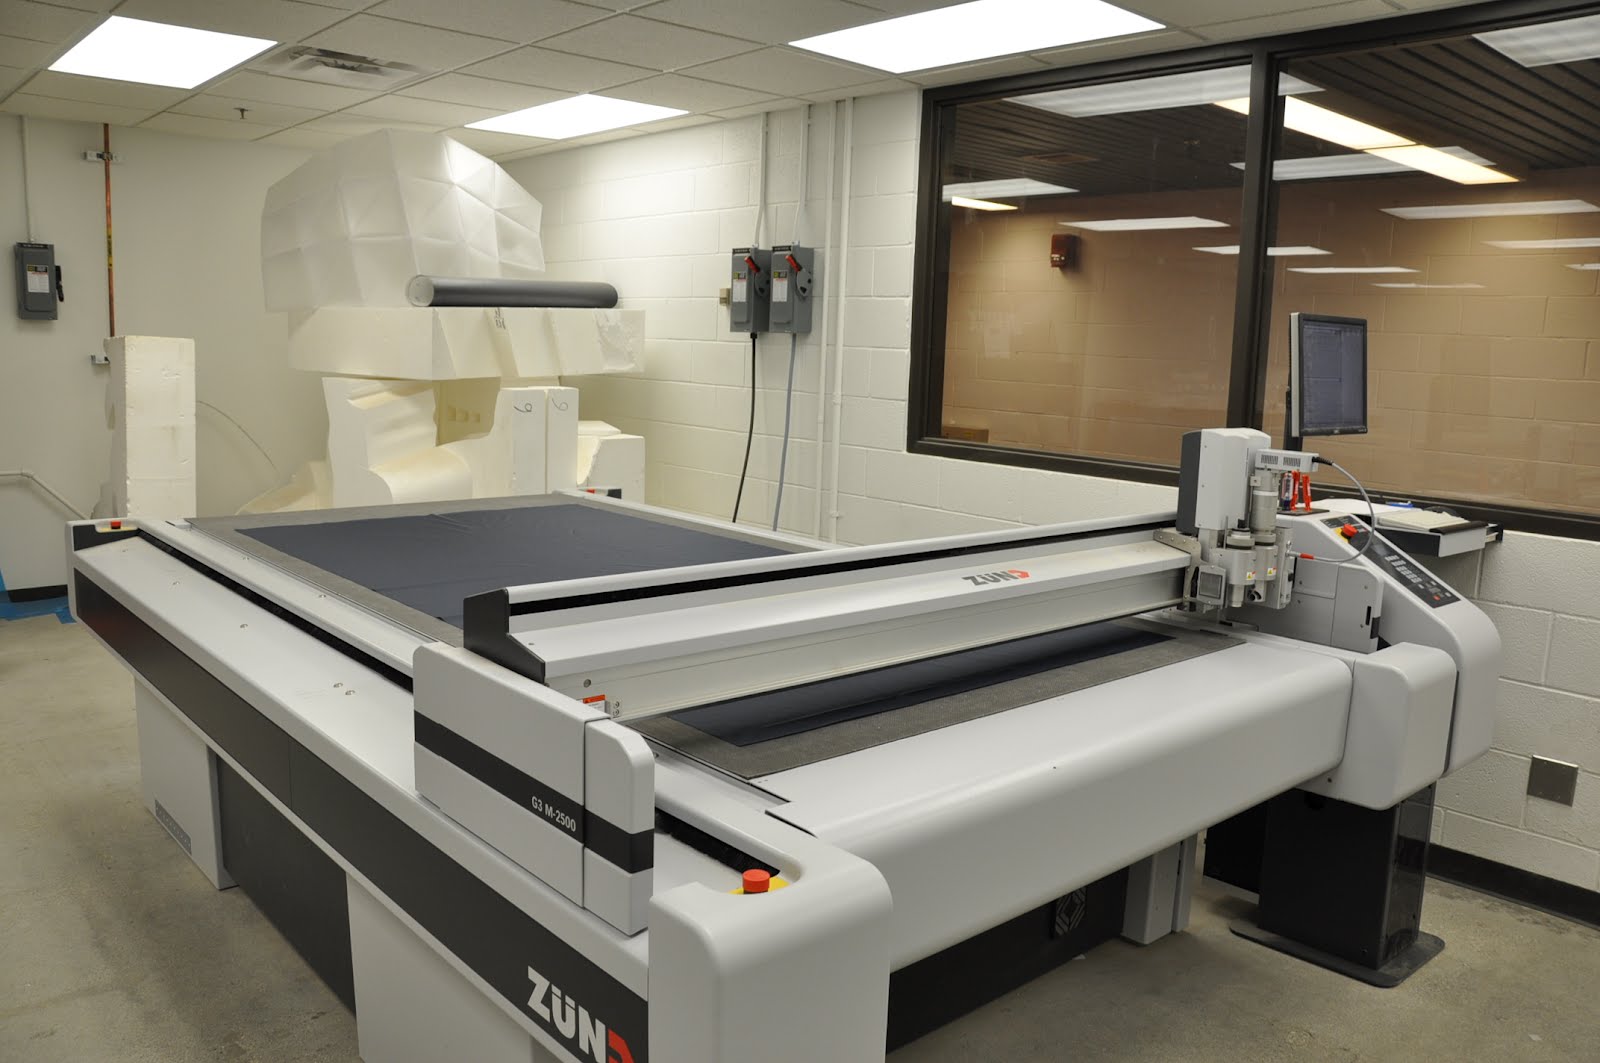
This is the Zund knife cutter. I purchased ten yards of the nylon rip stop material and before having this machine cut the fabric, I had to measure each sheet of nylon to be 8 ft long. Also, when I purchased the fabric it was wider than 4ft so I had to cut the fabric to be more narrow in order for the material to lay properly on the machine.

Image 2:
Along with the nylon rip stop, I purchased 2 yards of green polyester and 2 yards of white polyester. These colors represent the green trees, blue sky, and white snow that I have envisioned in my dream. It was important to buy a polyester that was similar in weight to the nylon rip stop in order for both materials to inflate at the same rate.

This is an image of all 3 colors after they had been cut but the Zund Knife Cutter. It was way more efficient and accurate than cutting each piece by hand.


Image 3:
After each piece of fabric was cut, I then realized I needed to figure out how to sew each shape and the order of putting the inflatable together. I measured each shape and then created a model on graph paper. As I put the model together, I figured out I had forgotten a key piece of the inflatable...the top. This top piece would connect the fan to the inflatable.


Image 4:
This is a fan Shaun Jackson let me borrow. It is made to circulate air through a yacht. It was perfect to find such a high powered fan that was so tiny. This device will make it easier for me to attach the inflatable and fan to the ceiling.

There were a few issues I had with the fan when it was first given to me. It was to high of a voltage to plug into the wall. So, I spoke with Professor Rodemer and he helped me find a converter that would allow me to plug in the fan. We also had to figure out how to rig the fan so it would constantly stay on. When it was first given to me, the fan was controlled by a switch. The process required careful cutting of wires and taping them together.

Image 5:
Using scrap pieces of the nylon, I put together the top portion of my inflatable. I created an air vent that would fit securely around the fan. The top piece was modeled after something similar to an umbrella structure or chandelier.


Image 6:
After the success of my first inflatable, I decided to use the same sewing techniques on this one. I double stitched each edge that attached to the top piece. This would secure the main outer structure and would help avoid any ripping or snagging that my occur from the weight of the fabric.

Image 7:
These are the 4 outer pieces attached to the top piece for the main frame of the inflatable. Each piece was 32 inches wide.


Image 7:
This image was taken from a ladder in order to see what the inflatable would potentially look like if it were hanging from a ceiling.

The sewing process was extremely confusing. The pyramid was much more simple. The confusion started because the structure had to be sewn inside out so the seams wouldn't show. It was difficult make sure that I was sewing each piece inside out as it grew in size. Also, It became very complicated to understand if I was missing any holes. If there were any holes it the inflatable, it would not inflate and I would have to start all over.

While I successfully was able to sew the structure together, there are still seams and edges I would like to go back and fix. My main issue at this point is that the inflatable is not inflating as much as I would like it to. Unfortunately, this means I will need to take the inflatable apart and resolve several issues.


Image 8:
Even though I used a ladder to see what the inflatable would look like from a higher point, I am still not able to get it as high as if I was hanging it from an actual ceiling. I also like the inflatable on the ground and several people in my review agreed. From this vantage point, the inflatable looks more like a creature and has a different kind of life that is brought to it.

Image 9:
For the postcard, I wanted to include both of my inflatables that way my audience can understand that the installation doesn't consist of a singular inflatable triangle. Since this one is not inflating as much as I would have hoped, I took several images of it and photo-shopped them together to make a more successful looking inflatable. Also, this allowed me to have a better idea of what I want the structure to actually look like.

AFTER MY REVIEW:
-Issue #1: It was brought to my attention that one of the issues with this one inflating would be that the air is escaping faster through the polyester instead of the nylon. While I made sure to find a similar weight of fabric to match the nylon, I did not consider the density of the material. With that being said, Professor Rodemer suggested that I take out one of the materials and possibly stick with just the nylon rip stop.
-Issue #2: My fan might not be powerful enough to support the structure
-Issue #3: Since the inflatable was so complicated to sew together, I might have some pieces that have a better air flow than others
-Suggestion #1: Since I painted and dyed the pyramid, I should do something more with this inflatable. The pyramid has much more life and sense of magic to it than this one at the moment
-Suggestion #2: Set each fan on a timer. Since each inflatable is from a different dream, maybe one could inflate, deflate, and then have the next one inflate. This idea is similar to a domino effect. Also, it would allow the audience to focus on one inflatable at a time
-Suggestion #3: Create this domino effect with fans being on timers and also set the timers to match a musical score
-Suggestion #4: Just focus on one dream...maybe because the pyramid was so successful and in my dream there was several pyramid shapes, I should create multiple pyramids.
-Suggestion #5: Create a wire frame to put inside the inflatable to help support its shape


While the suggestions and issues seemed very overwhelming, I agree with Marianetta that I should move on with the next inflatable or portion of my project so I do not get stuck on one idea. Maybe with whatever I work on next will lead to me to further ideas that will help solve my problems with the inflatable.


Logged Hours Monday Feb. 6th - Sunday Feb. 12th:
-Tuesday Feb. 7th: Create illustrator files for Zund cutter and work on fan conversions (10:30am - 11:30pm and 2:30pm - 4:30pm =3 hours)
-Thursday Feb. 9th: Work with Professor Rodemer to rig my fan in order for it to be able to plug into an outlet. Cut each piece of fabric to size so that it will fit on the knife cutter. Cut polyester pieces on knife cutter (9:30am - 11:30am and 2:30pm -8:30pm =8 hours)
-Saturday Feb. 11th: Purchase polyester fabric to add to the color and size of the inflatable (1:30pm - 2:30pm =1 hour)
-Sunday Feb. 12th: Cut polyester fabric on Zund Knife Cutter, measure each shape to create model, create model, pin each piece together in preparation for sewing (3pm-7pm and 8pm -1am =9 hours)

Total Hours: 21

Logged Hours Monday Feb. 13th - Sunday Feb. 19th:
-Monday Feb. 13th: Sew each shape together, create and design top piece, sew entire inflatable together (9:30am -12:30pm and 6:30pm -2am =10.5 hours)
-Tuesday Feb. 14th: Fix any seam issues with inflatable, inflate fabric, try and figure out if I can use an alternative fan that is larger and more powerful (10:30am - 1pm =2.5 hours)
Sunday Feb. 19th: Play around with model to think of other ways to more properly inflate fabric, photograph new inflatable, work on postcard images and ideas, (4pm -9:30pm =5.5 hours)

Total Hours: 18.5

litho progro

I got a lot of work done this week, which makes me right on my IP schedule - wooo!

Herez my hours:
Tuesday - Critique day. Drew on grid sheets with vine charcoal (2 hours).

Wednesday - (2 hours) met with off-site group

Thursday - Studio/class day (8 hours) finished drawing images on grids, transfered the images with dragon's blood (love that name). FINALLY drew on the 5 plates with the grease pens!

Friday -First etch, cut newsprint to size

Sunday - (6 hours) second etch and roll-up printing.


Here is a close-up of one of the litho plates before the first etch.

On Friday I did the first etch. Today I did a roll-up/second etch. I built up the image incredibbllyyy slowww(ly?)... Somehow the nose filled in really quickly. Newsprint is really thin so maybe the image appears darker than it is.


This is a close-up of the ear on newsprint. I really like the ear. It has nice contrast and good boards, I think it would make a really nice individual edition.


okeeyyy! bye!

Tuesday, February 14, 2012

Update- Teresa Dennis Nov 12th

Been working on UVs for my characters so I can bring them into the animation


Updated Video Environment


Monday- 8 hours
Tuesday- 7 hours
Thursday- 2 hours
Friday- 3 hours

UPDATE


I have been working on my third drawing of the series and will continue to do so this week. By my critique on Thursday i will have 2.5 drawings completed out of 4. This third drawing is probably going to take the most time because it is going to have the most action in it.
Hours:
Mon-3
Tues-6
Wed-2
Thur-6
Fri-2

Progress

Forgot about this til now. Last week I finalized the 12 illustrations and put them into indesign. I will be sending it out to print soon.
Monday- 4hours
Tues-6
Wed-4
Thurs-6

here are a few of the 12


In Progrezz stuff

I don't have any photos from my progress this past week. I was doing kind of boring stuff anyway.

In last week's post I showed photos of the new installation.
Monday- 1 hr. Re-positions segments to make image align.

Tuesday - class/studio day 3-4 hours. Meeting with professors. Figuring out how to transfer image to plates.

Wednesday - 4 hours. 2hrs Cutting and gridding paper that I will use to transfer images onto plate with conte. And 2 hrs working on 2nd thesis draft.

Thursday - 5 hours. Manipulated light, shadows, and contour of image on photoshop. Dennis O'Neil. Met with Bill Burgard for a mini-critique of installation. Discussed line quality and litho applicaiton techniques.

Sunday - 1 hr. Cut litho plates to custom sizes. Gum arabic-ed the boarders.

This week: I'm going to transfer and draw the images. I want to etch them this weekend.

Monday, February 13, 2012

Update, Filming This Weekend

So filming is set for this weekend for the indoor (house) and outdoor scenes in "Concertina".
Here are some of the completed accessories:
Concertina's cane (for outside)


Concertina's bracelet


I still have a few minor considerations for this weekend but the filming is all set to go.

The studio filming with the band will be next weekend in a studio on campus.

Hours for last week:
Monday- 2hrs
Tuesday-3hrs
Wednesday-2 hrs
Friday-4hrs

Hours for previous week (I see I forgot to post them)
Monday-5hrs
Tuesday-2hrs
Thursday-4hrs
Friday-3hrs
Sunday-2hrs