Showing posts with label progress. Show all posts

Monday, April 9, 2012

Elyse Shapiro Studio Progress Mar 19-25

Studio Progress Update for Week of March 19th- 25th

This week in the studio, I spent the majority of my time developing the design and cutting the stencil for my third and final lighting fixture. This last stencil will display the skyline of downtown Detroit. The area is clean and beautiful so I cut it with extremely fine lined details. This first image is the stencil prior to being cut. I will cut the lighter area of the stencil and the darker part will serve as the vellum beneath the stencil cut.

The second image is of me, cutting the stencil in my studio. In addition, the dress I’m wearing is also of my own creation; the material was hand-printed and sewn using a personally customized pattern.

The next image is of the third stencil mid-cut. The stencil is cut entirely by hand using the print out on top of the black paper as a guide.

The final images are of the stencil once it has been completely cut. After many, many hours of work, the stencil is complete and ready to be applied to the vellum layer. This is the completion of my final stencil cut for my IP.


In-studio hours, week 7:

· Monday- Cut stencil 3 10AM-4PM (6 hours)

· Tuesday- Cut stencil 3 8:30AM- 4:30PM (8 hours)

· Wednesday- Cut stencil 3 4PM- 10PM (6 hours)

· Thursday- Cut stencil 3 1PM- 7 PM (6 hours)

· Friday- Finish cutting stencil 3 1 PM- 3 PM (2 hours)

· Total: 28 hours

Friday, April 6, 2012

Progress March 25-April 1

Image 1: After completeing the sewing, I was able to finally inflate my second piece!


Once I got the fabric in the mail I had to cut it into 4ft by 8ft strips to fit on the Zund knife Cutter. While I only needed to cut the fabric into strips, I wanted to make sure it was exact so when I went to sew it, the fabric would line up exactly the way I wanted it to.


Image 2,3, and 4: After cutting the fabric into strips I was able to print the strips using the photo screen I created. I had to screen print 12 strips of white nylon rip stop in total. It was extremely time consuming but looks great!

Image 5: After sewing each piece of fabric in a line, and then a tube shape, I was able to test them to see if they would inflate. Luckily I was able to borrow 3 box fans that were all the exact same size! This was a test to see how well the inflate. They are not exactly how I would like them to look so over the next week I will add an circular end piece to the front to close off the inflatable and I will also add an air vent to the back of each tube to help the fabric inflate better.

I have also continued to be in contact with Jeff Alder. He contacted a few companies and we discussed exactly what lighting I will need to rent for the show. I will be picking up the various lights on Monday. Jeff also got me in contact with a girl Vicki who recently did a backdrop for a show at the Duderstadt. The back drop included different colored dyes and oils that create a kaleidoscope effect. I was allowed to take this footage and will be editing it using Final Cut pro over the next week. Another person Jeff helped me contact was Tom Bray who is helping me set up the kaleidoscope footage to be put onto a projector. I am planning on projecting the footage onto the pyramid shape.

Logged Hours:
-Monday: 6 pm- 11 pm (finish sewing 2nd inflatable -5 hours)
-Tuesday: 1:30 pm-7:30 pm (work on lighting and cutting fabric -6 hours)
-Wednesday: 5 pm-12:30 am (cont. working on lighting, cutting fabric, and making photo screen-7.5 hours)
-Friday: 3 pm-8:30 pm (pinning down fabric and figuring out dimensions of repeat for photo screen-6.5 hours)
-Sunday: 4 pm-12:30 am ( screen printing dot design-8.5 hours)

Total Hours: 33.5 hours

Progress: March 18-25

Image 1: This was my 2nd inflatable. The main concept was a re-occurring dream about Colorado. It was supposed to represent the mountains, snow and the deep blue sky. Since there were 2 different types of fabrics that were used in this piece, the fabrics were different densities and would not inflate at the same rate. Because of this, it did not inflate the way I had intended it to.

So, I decided to take this original design apart and start from the beginning. I finally got my fabric in for the rest of my IP project and was able to use the Zund knife cutter to create more of these octopus like shapes for the rest of this piece.


Image 2: This is a test strip of the nylon rip stop I used for the inflatable. I wanted to make sure that the textile paint pigments worked with the nylon material. Luckily it did!
Image 3,4, and 5:
These are pieces of the nylon rip stop that I hand painted using different shades of pinks, oranges and blues. The imagery's shape represents mountains, the deep blue color represents the color of the sky, and the bright pinks, oranges and blues represents the various colors of the sunset.

Image 6: After hand painting each shape, I then sewed all the halves together.


Image 7: Since the time I inflated this piece it did not inflate the way I had hoped, I decided to make one of the top seams Velcro that way if it doesn't inflate the second time around, I wont have to take it a part and re-sew it once again.

Logged Hours:
-Tuesday: 11 am-6 pm (take a part inflatable-7 hours)
-Wednesday: 8 pm-12:30 am (draw designs onto fabric-4.5 hours)
-Thursday: 12 pm-4:30 pm (cut other fabric on Zund Cutter and draw the rest of designs-4.5 hours)
-Friday: 1 pm-8 pm (paint fabric pieces-7 hours)
-Saturday: 3 pm-10 pm (paint fabric pieces-7 hours)
-Sunday: 4 pm-12:30 am (paint fabric and figure out how to put inflatable together-8.5 hours)

Total Hours: 38.5 hours

Progress March 11-18

During this week I had many set backs. I discovered my fabric was on back order and did everything I could to stay on top of my work.Image 1: First I realized I needed to re-do my repeat for the next three inflatables. The issue was the original repeat design was too large to fit on the silk screen. I also wanted to re-do the design to make it more symmetrical. Before, the dots were not as organized and measured correctly.

While I was still waiting to receive the fabric, I printing out the dot design for the worms on vellum so it could be transferred onto a photo screen for printing. Using photo screen emulsion I prepped the screen for the fabric printing.


Image 2, 3, and 4: I also wanted to figure out what imagery I wanted to put on the 2nd inflatable that I needed to re-d0. The 2nd inflatable was created to represent the sky and mountains in colorado. I have been having a re-occuring dream where I snowboarding or in the mountains in colorado. One of the most memorable images from the dream was looking up at the sky and how deep blue the sky was with such brightly colored clouds there were when the sun set. I got a lot of inspiration from paper artist Bovey Lee. I took some of the images in her work and transported them into photoshop. After altering the images I printed them out so I could project them onto the fabric and draw them on with a pencil before painting them.

For lighting, I met with Jeff Alder who works at the Duderstadt to discuss different options for lighting my 5 different inflatables. We started an email thread with Mark Neilson and Peter who work together for the galleries. We discussed with them how much wattage I would be capable of using without have the art school's electricity go out!

Logged Hours:
-Monday: 3
-Tuesday: 6
-Wednesday: 2
-Thursday:6
-Friday:4
-Sunday: 6

Total Hours:28

Tuesday, March 13, 2012

Progress Since Spring Break

Before break I went to Professor Rodemer's electrical equipment where he, along with Jan helped me figure out some technical details for my installation. During this time Jan recommended I contact an inflatable artist that previously did work at U of M. I went to her site... http://www.patoleszko.com/ and contacted her via email. She was able to answer several questions of mine that concerned materials and fans. She also informed me that she is coming to Ann Arbor around the same time as we are setting up the IP installation so I am hoping to meet with her before the show opens!

For my next inflatable design I wanted to create something that would be much more simple to sew together compared to my last piece that I still need to go back and work on. I am planning on making these three tube like structures that you see on the left. They are a representation of a dream I had where I boiled these dead birds in a pot and then they slowly became brightly colored worms. After I figured out the design, I needed to calculate how large each structure would be and how much fabric I needed to purchase. My calculations are shown in the image on the right.
This is more math of me trying to figure out how much fabric to buy (image on the left). After I figured out how much fabric I needed to purchase I then needed to figure out the sizes to cuz the fabric on the zund knife cutter (image on the right). Even though I am only cutting the fabric into strips for this design, I still want to make sure that each piece is the exact same size.

I called the fabric store that I have been getting my material from and decided to purchase white nylon rip stop so that the bright colors would really pop off of the white. I made sure to text the textile paint that I plan on using for this design on some of the same navy nylon rip stop I had purchased for my last inflatable. The paint seems to really hold to the material so I think it will work ok.

While my fabric still has yet to come, I made sure to create illustrator files for the Zund knife cutter and make an illustrator for the design I plan on printing onto these inflatables.

This is just a screen shot so it is relatively blurry but this is the design I created in illustrator that will be screen printed onto the rip stop. It is modeled after Roy Lichtenstein's dot pattern found on most of his work that reminds me of a comic book. The dots will be the three colors that i remember the worms being in my dream; orange, pink and red. I thought this design my emphasize the the ripples that worms have when you look at them up close.

This is a close up of the design. It will be 12 inches wide and I made sure to put the design in repeat so it would be easy to print. I also talked to Sherri to make sure the dots weren't too small to use a photo emulsion screen.

So far, I have borrowed fans from the fibers studio so I looked into renting vs. purchasing fans. I also sent out a mass email to the IP group seeing if anyone had any lighting or fans I could borrow for the exhibition. Few - no people responded. However, I found out that target has the best selection of fans with a 90 day return policy. So, my plan is to purchase the fans and return them after the show ends. As for lighting, emailed Jeff Alder, a U of M faculty member that works at the Dude on lighting and stage setup. I was informed that I will not be able to rent the equipment I thought I could from the Dude and that Jeff would be able to help me "make" the right lights I need. Hopefully he responds to me soon so I can figure everything out.


Logged Hours:
First off, I have been having a difficult time with the scanner and that is why I was not able to post my work over this past weekend. Luckily I was able to get it to work again and finally post. However, after spring break, it is hard for me to log my hours during that time considering I was on vacation.

Monday: 4 hours
Tuesday: 6 hours
Thursday: 4 hours
Friday: 5 hours
Sunday: 5 hours

Total: 24 hours

New Schedule for the last month:

Week 1 (March 11-18th)
-try and contact the Michigan theater program or dude center to see if I can rent/borrow industrial lighting equipment
-figure out if I should make a photo emulsion screen or laser cut design onto paper
-cut fabric using zund knife cutter
-sew material
-make photo screen

Week 2 (March 18th - 25th)
-Finalize all lighting and fans
-figure out what fabric to put on the end of each worm
-go back and fix 2nd hanging inflatable

Week 3 (March 25th - April 1st)
-last minute touches on inflatables
-think of additions and entry way for installation
-how to secure attach fans to inflatables

Sunday, February 19, 2012

Progress

This blog post of for the past two weeks.

Image 1:
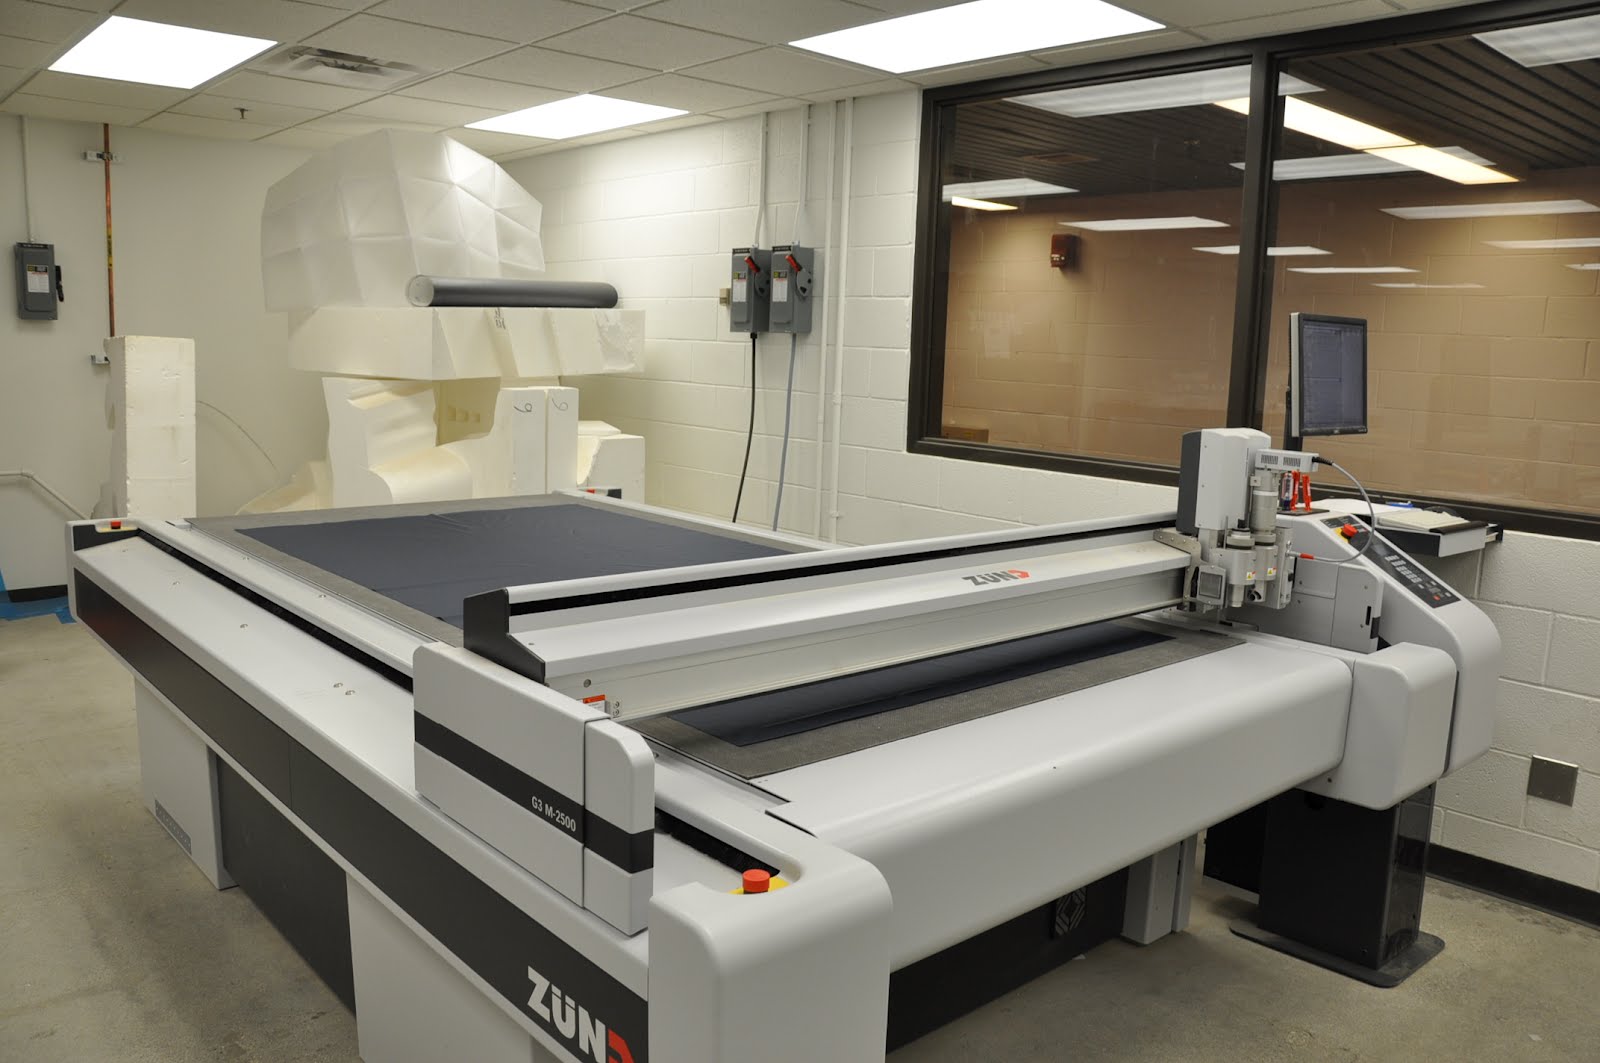
This is the Zund knife cutter. I purchased ten yards of the nylon rip stop material and before having this machine cut the fabric, I had to measure each sheet of nylon to be 8 ft long. Also, when I purchased the fabric it was wider than 4ft so I had to cut the fabric to be more narrow in order for the material to lay properly on the machine.

Image 2:
Along with the nylon rip stop, I purchased 2 yards of green polyester and 2 yards of white polyester. These colors represent the green trees, blue sky, and white snow that I have envisioned in my dream. It was important to buy a polyester that was similar in weight to the nylon rip stop in order for both materials to inflate at the same rate.

This is an image of all 3 colors after they had been cut but the Zund Knife Cutter. It was way more efficient and accurate than cutting each piece by hand.


Image 3:
After each piece of fabric was cut, I then realized I needed to figure out how to sew each shape and the order of putting the inflatable together. I measured each shape and then created a model on graph paper. As I put the model together, I figured out I had forgotten a key piece of the inflatable...the top. This top piece would connect the fan to the inflatable.


Image 4:
This is a fan Shaun Jackson let me borrow. It is made to circulate air through a yacht. It was perfect to find such a high powered fan that was so tiny. This device will make it easier for me to attach the inflatable and fan to the ceiling.

There were a few issues I had with the fan when it was first given to me. It was to high of a voltage to plug into the wall. So, I spoke with Professor Rodemer and he helped me find a converter that would allow me to plug in the fan. We also had to figure out how to rig the fan so it would constantly stay on. When it was first given to me, the fan was controlled by a switch. The process required careful cutting of wires and taping them together.

Image 5:
Using scrap pieces of the nylon, I put together the top portion of my inflatable. I created an air vent that would fit securely around the fan. The top piece was modeled after something similar to an umbrella structure or chandelier.


Image 6:
After the success of my first inflatable, I decided to use the same sewing techniques on this one. I double stitched each edge that attached to the top piece. This would secure the main outer structure and would help avoid any ripping or snagging that my occur from the weight of the fabric.

Image 7:
These are the 4 outer pieces attached to the top piece for the main frame of the inflatable. Each piece was 32 inches wide.


Image 7:
This image was taken from a ladder in order to see what the inflatable would potentially look like if it were hanging from a ceiling.

The sewing process was extremely confusing. The pyramid was much more simple. The confusion started because the structure had to be sewn inside out so the seams wouldn't show. It was difficult make sure that I was sewing each piece inside out as it grew in size. Also, It became very complicated to understand if I was missing any holes. If there were any holes it the inflatable, it would not inflate and I would have to start all over.

While I successfully was able to sew the structure together, there are still seams and edges I would like to go back and fix. My main issue at this point is that the inflatable is not inflating as much as I would like it to. Unfortunately, this means I will need to take the inflatable apart and resolve several issues.


Image 8:
Even though I used a ladder to see what the inflatable would look like from a higher point, I am still not able to get it as high as if I was hanging it from an actual ceiling. I also like the inflatable on the ground and several people in my review agreed. From this vantage point, the inflatable looks more like a creature and has a different kind of life that is brought to it.

Image 9:
For the postcard, I wanted to include both of my inflatables that way my audience can understand that the installation doesn't consist of a singular inflatable triangle. Since this one is not inflating as much as I would have hoped, I took several images of it and photo-shopped them together to make a more successful looking inflatable. Also, this allowed me to have a better idea of what I want the structure to actually look like.

AFTER MY REVIEW:
-Issue #1: It was brought to my attention that one of the issues with this one inflating would be that the air is escaping faster through the polyester instead of the nylon. While I made sure to find a similar weight of fabric to match the nylon, I did not consider the density of the material. With that being said, Professor Rodemer suggested that I take out one of the materials and possibly stick with just the nylon rip stop.
-Issue #2: My fan might not be powerful enough to support the structure
-Issue #3: Since the inflatable was so complicated to sew together, I might have some pieces that have a better air flow than others
-Suggestion #1: Since I painted and dyed the pyramid, I should do something more with this inflatable. The pyramid has much more life and sense of magic to it than this one at the moment
-Suggestion #2: Set each fan on a timer. Since each inflatable is from a different dream, maybe one could inflate, deflate, and then have the next one inflate. This idea is similar to a domino effect. Also, it would allow the audience to focus on one inflatable at a time
-Suggestion #3: Create this domino effect with fans being on timers and also set the timers to match a musical score
-Suggestion #4: Just focus on one dream...maybe because the pyramid was so successful and in my dream there was several pyramid shapes, I should create multiple pyramids.
-Suggestion #5: Create a wire frame to put inside the inflatable to help support its shape


While the suggestions and issues seemed very overwhelming, I agree with Marianetta that I should move on with the next inflatable or portion of my project so I do not get stuck on one idea. Maybe with whatever I work on next will lead to me to further ideas that will help solve my problems with the inflatable.


Logged Hours Monday Feb. 6th - Sunday Feb. 12th:
-Tuesday Feb. 7th: Create illustrator files for Zund cutter and work on fan conversions (10:30am - 11:30pm and 2:30pm - 4:30pm =3 hours)
-Thursday Feb. 9th: Work with Professor Rodemer to rig my fan in order for it to be able to plug into an outlet. Cut each piece of fabric to size so that it will fit on the knife cutter. Cut polyester pieces on knife cutter (9:30am - 11:30am and 2:30pm -8:30pm =8 hours)
-Saturday Feb. 11th: Purchase polyester fabric to add to the color and size of the inflatable (1:30pm - 2:30pm =1 hour)
-Sunday Feb. 12th: Cut polyester fabric on Zund Knife Cutter, measure each shape to create model, create model, pin each piece together in preparation for sewing (3pm-7pm and 8pm -1am =9 hours)

Total Hours: 21

Logged Hours Monday Feb. 13th - Sunday Feb. 19th:
-Monday Feb. 13th: Sew each shape together, create and design top piece, sew entire inflatable together (9:30am -12:30pm and 6:30pm -2am =10.5 hours)
-Tuesday Feb. 14th: Fix any seam issues with inflatable, inflate fabric, try and figure out if I can use an alternative fan that is larger and more powerful (10:30am - 1pm =2.5 hours)
Sunday Feb. 19th: Play around with model to think of other ways to more properly inflate fabric, photograph new inflatable, work on postcard images and ideas, (4pm -9:30pm =5.5 hours)

Total Hours: 18.5

Monday, February 13, 2012

Update Monica Ross 2/13/2012

This week I got Sherri Smith in for voice acting. I'm making a master file to load in final sound and completed frames.I'm going to be building it up for the critique next week. I was away for the weekend and so I have to make up a lot of work this week. Last week I was in the studio for 3 hours on Monday,6 on Tuesday and Thursday. This is a mere 15 hours... The weekend really took a lot of time away.

I'm a little less worried about finishing my project. I've decided to take out a loan so I can get March off work.I'm sure I can complete the project with that extra time.

Sunday, February 12, 2012

Elyse Shapiro Studio Progress Feb 6-12

Studio Progress Update for Week of February 6th to 12th

This week was very important to my project in terms of vision and structure. After going through a great slump with the progression of my IP project, I have made some major decisions that will alter the nature of my pieces due to the material. I am no longer utilizing textiles in my pieces, but rather have decided to focus on the the true passion behind this work- stencil cutting. By minimizing the materials I am working with, I have decided it will be more successful if it is less complicated. For my new lighting fixtures, I have decided to cut stencils of Detroit, but have narrowed my subject matter to the remaining infrastructure of Detroit today; this will allow the imagery to be more cohesive from piece to piece. I have also decided to cut color from my pieces. They will be cut into thick black paper, and have a layer of vellum printed beneath them. The vellum will serve as a distribution tool for the light source within, while providing more detailed information for the imagery when the light is turned on. Though there is no color in the pieces, I feel that the black and white imagery will be complementary to the imagery it is intending to portray.
As I begin to work on my first piece, I have decided to take imagery I collected from photographing the Packard Plant in Detroit. As with my initial imagery, I have decided to fabricate the actual images to make them more rich and provide additional sides and views of the plant. Once compiled in photoshop, the imagery looked as follows:
Once compiled, I created this image using photoshop. The area that is orange is my guide when cutting the black paper. I printed the imagery and attached it, not following the lines but using them as an idea of where to begin.

Atop of the imagery as I was cutting it is the detailed stamp layer that will be printed on the vellum. Below, you can see the details that will be printed on the vellum and placed beneath the stencil cutting. This is important to me as I cut the stencil layer because I can see where the most pattern, detail, and grain lay.


After countless hours of cutting, the final image is completed. The image has a lot of additional details that were previously non-existent. The image is highly stylized but I think is quite compelling.
I am eager to see what the imagery looks like placed on top of one another, and am looking forward to better creating a more functional and industrial looking lamp. The metal will now be visible, and rather than getting messy with glue, I am interested in experimenting with sandwiching the two layers together between the polycarbonate and a mylar piece. Once screwed in, I hope the pieces will be secured and clean looking with no visible adhesive materials. Another decision I have made regarding the structure is to attempt to use nails/ studs/ rivets to secure the polycarbonate to itself, rather than zap-a-gap. This will make the pieces appear more industrial, but cleaner and more thoroughly put together. The studs will be placed periodically at a short distance and will be taken into consideration of where they lay within the stencil cutting.

In-studio hours, week 6:

Monday- Project reconstruction and idea sketching session (4 hours)

Tuesday- Go to Detroit to photograph closed schools on the east side, the packard plant, and other interesting abandoned buildings (7 hours)

Wednesday- Compile imagery for first lamp shade, develop stencil layer and stamp layer for vellum. Begin to cut stencil (8 hours)

Thursday- Cut stencil in studio (10 hours)
Friday- Cut stencil in studio (7 hours)

Saturday- Complete first stencil cut, remove old imagery from polycarbonate barrel, work on potentially creating old stencil cut into new imagery on black paper (6 hours)

Total: 42 hours

Monday, February 6, 2012

Progress

After speaking with our professors regarding my upcoming inflatable design I went back to the drawing boards and furthered my research in order to reassess my design.

one website that I gained great inspiration from over this past week was www.akairways.com the website had some great inflatable designs that they have created for public spaces and music festivals. Here a couple images that I found most intriguing.


Another inspiration for my new design was an artist that I had been meaning to research previously. I really loved Yayoi Kusama's installation work. Here is one image that really caught my eye.
After my research I created several sketches for my new inflatable idea. The drawing is a representation of both ice and mountains. As I said, my professors made me consider more abstract representations of my dreams so they are less literal. I like this idea more because it would allow the viewer to create their own ideas about what the inflatable represents/means to them.

Image 1:
This new design would hand from the ceiling and a motor/fan would be attached in the middle. The design is a lot like a ceiling fan or chandelier in how it would work. I also picked up a yacht air motor from Shaun Jackson that is only about 6" in diameter and would be very easy to attach to the ceiling. However, I have several questions regarding how to attach it to the ceiling and that is why I requested Shaun to be the guest for my critique next Tuesday.

Image 2 (left):
I also needed to figure out how large each "ice/mountain" shape would be. Sizes would vary from 4ft -2ft. I took into consideration how tall a typical ceiling is since I still do not know my exact installation site. It was important to me that the viewers would feel the scale of the inflatable while also being able to walk around it and under certain parts. When making these calculations, I started to become increasingly concerned that I still do not know my site of installation and it is starting to become a HUGE issue. The entire layout and design of the installation could change depending on its location. I realized I needed to take into consideration the length of each wall, height of ceiling, where lighting and outlets are located. As my stress grew, I went back and emailed Mark Neilson once more to explain the severity in knowing the site. Hopefully he gets back to me asap.

Image 3 (right):
Last week I did a demo on the laser cutter above the wood shop. However, this week I discovered that the laser cutter did not do what I wanted so I discovered the Zund Knife Cutter across the hall. It is an amazing machine! The Zund Cutter takes illustrator files and cuts everything from paper, polyester, carpet and even plastic. The machine will be perfect for cutting larger shapes for sewing. It is very difficult to create such large inflatable structure by cutting each shape by hand. Also, because the machine can cut such intricate designs, I have so many more ideas as far as ways to add to my final installation. At the beginning of the year I discussed with our professors that not everything needs to be an inflatable. Now I am planning to include other laser cut fabric designs along with prints and weaving projects. This sketchbook page includes my notes from the Zund tutorial.

Image 4:
Since I already bought 10 yards of the nylon rip stop, I wanted to incorporate that fabric into my new design. From my tutorial I learned that the Zund cutter dimensions can cut 4ft x 8ft at a time. This means I will need to layout my illustrator file into 5 segments and make sure each piece matches up to another half. I am also considering purchasing other fabric so the inflatable isnt just one color. I am thinking that I will need 2 yards, 4 total, of the two different fabrics I am also planning on including.

Logged Hours:
Tuesday January 31st: Revamp design and research new ideas: 4pm - 9pm (5 hours)

Wednesday February 1st: Continue research and start sketching: 1pm - 5pm (4 hours)

Thursday February 2nd: Finalize new idea, research materials, consider scale and installation site, and learn about Zund Cutter (how does it work, how do I sign up): 10am - 1:30pm and 2:30pm - 4:30pm (5.5 hours)

Sunday February 5th: Zund tutorial and figuring out new budget and dimensions of materials for Knife Cutter: 12pm - 3pm and 6-8 pm (5 hours)

Total Hours: 19.5

Sunday, February 5, 2012

Monica Ross - Update 2/5


I am still scanning and editing my papers from this week, so nothing to show yet outside of this small bit.
Sherri is going to be voice acting for one of my leads. Still waiting to hear from Jan, we'll see.

I was in the studio from 8:30am - 4:00 pm on Tuesday and Thursday this week. As well as Monday from 11pm - 6am, and for a couple of hours this weekend after work. All together = 24 hours this week in the studio.

Next Sunday I'll post everything I scan tonight and tomorrow after I condense it all into video.

Monday, January 30, 2012

Progress

I have been going back and forth about materials and embellishments for my next inflatable. However, the overall design still remains.

I received the nylon rip stop that I had ordered and sampled using the surger on the material. I plan to use this material with the surger for the middle tube that connects both ends. Also, I purchased other materials that I might use for both ends instead of the clear plastic.

I also made a mini model to see if the material would inflate. This is the front of the model. I cut out the chiffon material because I would like to create a laser cut snow flake design with the chiffon and the anti-static polyester behind it.

This is the side of the model. I would like to also create laser cut snowflake design that pleat along the sides. I really like how if you fold the chiffon over itself it creates a darker color.
This is the snowflake pleated design I created in illustrator. I have set aside a time on tuesday to use the laser cutter and see what the design looks like when it is actually cut into the fabric

Next Week:
-Test laser cut design
-make a few more models testing materials
-start the body of the final inflatable with nylon rip stop and surging technique
-finalize end designs

Logged Hours:
Monday January 23rd: Test other plastic materials and concepts (9am- 12pm and 7pm-10pm) 6 hours

Tuesday January 24th: Laser cutter demo, analyzing designs, look at different motors and fans since I have yet to purchase any, and think of other ways besides inflatables to add to installation ( 10am - 1:30pm, 2:30pm - 6pm, and 7-11pm) 12 hours

Thursday January 26th: Look at different laser cut design ideas and create designs in illustator (9 am -12:30 pm) 3.5 hours

Sunday January 29th: Purchase other fabric and create model (5 pm- 9pm) 4 hours

Total: 25.5